|
在网页设计中,常常要使用 html 文本框来收集一些用户信息或是制作登录页,虽然只是简单的输入框,但是如果加入一些美化设计会使你的页面看起来更加有吸引力,下面就给大家提供了一些 html 文本框的参考样式和常见的 html 操作技巧,希望对你的网页制作有帮助。首先我们先看看一个最简单的文本框是如何实现的?
--------------------------------------------------------------
W3Cschool文本输入框实例:
--------------------------------------------------------------
如上实例所示,其实这个 html 文本框样式非常简单,用到了 css 的伪元素 focus。下面我们一起来重新做一个吧。首先我们需要在你的页面上添加一个文本框代码如下:
W3Cschool文本输入框实例:<input type="text" value="请输入文本" >
这个是我们最常见到的按钮了,它没有任何的样式。现在我们来添加一些好看的样式,代码如下:
.mytxt {
color:#333;
line-height:normal;
font-family:"Microsoft YaHei",Tahoma,Verdana,SimSun;
font-style:normal;
font-variant:normal;
font-size-adjust:none;
font-stretch:normal;
font-weight:normal;
margin-top:0px;
margin-bottom:0px;
margin-left:0px;
padding-top:4px;
padding-right:4px;
padding-bottom:4px;
padding-left:4px;
font-size:15px;
outline-width:medium;
outline-style:none;
outline-color:invert;
border-top-left-radius:3px;
border-top-right-radius:3px;
border-bottom-left-radius:3px;
border-bottom-right-radius:3px;
text-shadow:0px 1px 2px #fff;
background-attachment:scroll;
background-repeat:repeat-x;
background-position-x:left;
background-position-y:top;
background-size:auto;
background-origin:padding-box;
background-clip:border-box;
background-color:rgb(255,255,255);
margin-right:8px;
border-top-color:#ccc;
border-right-color:#ccc;
border-bottom-color:#ccc;
border-left-color:#ccc;
border-top-width:1px;
border-right-width:1px;
border-bottom-width:1px;
border-left-width:1px;
border-top-style:solid;
border-right-style:solid;
border-bottom-style:solid;
border-left-style:solid;
}
当我们添加了样式以后,我们需要在文本框中引用此样式。修改文本框代码如下:
好了我们基本的文本框样式完成了,现在我们需要再次添加 focus 按钮。首先简单的介绍一下 focus 按钮的作用:就是当我们箭头在文本框中的时候触发此样式。
添加 css 样式如下:
.mytxt:focus {
border: 1px solid #fafafa;
-webkit-box-shadow: 0px 0px 6px #007eff;
-moz-box-shadow: 0px 0px 5px #007eff;
box-shadow: 0px 0px 5px #007eff;
}
因为我们鼠标移进去的时候,需要修改边框的颜色和一些阴影,所以上面的代码就够了!希望你能从上面的例子中得到启发。
现在,我们一起来看看几个好用的 html 表单文本框是如何实现的。表单的文本框分为单行文本框和多行文本框,故名思义,单行文本框用于输入一些简短的信息,如:姓名、E_mail地址、口令等等;多行文本框用于输入内容较长的信息,如:用户意见、评论、留言等。只要你理解了表单的文本框参数的含义,制作接收信息的文本框是不难的,请看下面的例子。

本例的源代码如下:
<p>您的姓名: <input type="text" name="text1" size="12" maxlength="20">
您的E_mail: <input type="text" name="text2" size="20" maxlength="24" value="*****@*.*">
输入口令: <input type="password" name="text3" size="8" maxlength="8"> </p>
<p align="center">
<input type="submit" name="提交" value="提 交">
<input type="reset" name="重写" value="重 写">
本例中用了三个单行文本框来分别接收用户的“姓名”、“E_mail地址”和“口令”信息,在三个文本框中都设定文本框的宽度(size)和最大输入文本长度(maxlength),在第二个文本框中还设定了初始值(value),你可能注意到了,我把每个文本框的名称(name)都取成了英文名,这样对用于程序外理比较方便,因下例中要用这个例子。若是用电子邮件接收表单信息并不用程序处理,那么用中文名比较直观。
为了使其成为一个具有实际交互功能的表单,加上了一个提交按钮,并在<form>标记中设定了action参数为:action="mailto:3400982550@qq.com" ,同时把 method 参数设置为:method="post",这样,一旦按下“提交”按钮将会把信息通过电子邮件发到“3400982550@qq.com”信箱。看来制作并不难!是吗?不过要注意:size 的值小于 maxlength 的值时,当内容超过输入窗口的长度时会自动滚动;反之,size的值大于maxlength的值,超过maxlength长度的内容无法输入。

<script language="javascript">
<!--
function test(form){
test1(form);
test2(form);
test3(form)}
function test1(form){
if (form.text1.value=="")
alert("你没有写上你的姓名,请输入姓名!")
}
function test2(form){
if (form.text2.value==""||form.text2.value.indexOf('@',0)==-1)
alert("E_mail地址不正确,请重新输入!")
}
function test3(form){
if (form.text3.value!="12345678")
alert("密码错误,请重新输入!")
}
-->
</script>

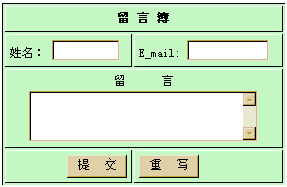
这个留言簿虽简单,但已包含了留言簿的基本功能,它是通过邮件的方式接收用户的信息,无需 CGI 支持。它的制作也比较简单,它采用表格产生立体效果,在表单中先插入一个表格,并设置好表格的有关参数,在表单方面,只是比例一多了一个多行文本框。在<input>标记中设置 type="textarea",不能得到一个多行文本框。我们用HTML的另一个标记<textarea>来设置一个多行文本框,若是默认的文本框大小不合适,可通过设定cols和rows参数来调整窗口的大小。其它标记参数的设置同例一。本例完成后的源代码如下:
<table width="50%" border="1" bordercolorlight="#000000" bordercolordark="#FFFFFF" bgcolor="#CCFFCC" cellpadding="4" align="left">
<tr><td colspan="2"> <div align="center"><b>留 言 簿</b></div> </td></tr>
<tr><td>姓名: <input type="text" name="textfield" size="8"> </td>
<td>E_mail: <input type="text" name="textfield2" size="10" maxlength="20"> </td>
</tr>
<tr><td colspan="2"> <div align="center">留 言<br> <textarea name="textfield3" cols="30" rows="3"></textarea></div></td></tr>
<tr><td> <div align="right"> <input type="submit" name="Submit" value="提 交"> </div> </td>
<td> <input type="reset" name="Submit2" value="重 写"> </td></tr></table>
输入框景背景透明:
<INPUT value="Type here" NAME="user_pass" TYPE="text" SIZE="29" onmouseover="this.style.borderColor='black';this.style.backgroundColor='plum'"
style="width: 106; height: 21"
onmouseout="this.style.borderColor='black';this.style.backgroundColor='#ffffff'" style="border-width:1px;border-color=black">
输入字时输入框边框闪烁(边框为小方型):
<Script Language="JavaScript">
function borderColor(){
if(self['oText'].style.borderColor=='red'){
self['oText'].style.borderColor = 'yellow';
}else{
self['oText'].style.borderColor = 'red';
}
oTime = setTimeout('borderColor()',400);
}
</Script>
<input type="text" id="oText" style="border:5px dotted red;color:red" onfocus="borderColor(this);" onblur="clearTimeout(oTime);">
<style>
#oText{border:1px dotted #ff0000;ryo:expression_r(onfocus=function light (){with(document.all.oText){style.borderColor=(style.borderColor=="#ffee00"?"#ff0000":"#ffee00");timer=setTimeout(light,500);}},onblur=function(){this.style.borderColor="#ff0000";clearTimeout(timer)})};
</style>
<input type="text" id="oText">
自动横向廷伸的输入框:
自动向下廷伸的文本框:
只有下划线的文本框:
软件序列号式的输入框:
<script for="T" event="onkeyup">
if(value.length==3)document.all[event.srcElement.sourceIndex+1].select();
</script>
<input name="T" size="5" maxlength="3">—<input name="T" size="5" maxlength="3">—<input name="T" size="5" maxlength="3">—<input name="T" size="5" maxlength="3">—<input name="T" size="5" maxlength="3">—<input name="T7" size="5" maxlength="3">
软件序列号式的输入框(完整版):
var sn=new Array();
for(i=0;i<T.length;i++)
sn=T.value;
alert(sn.join("—"));
</script>
<input name="T" size="5" maxlength="3">—<input name="T" size="5" maxlength="3">—<input name="T" size="5" maxlength="3">—<input name="T" size="5" maxlength="3">—<input name="T" size="5" maxlength="3">—<input name="T" size="5" maxlength="3">
<input type="submit" name="Submit">
border-radius 属性可以实现元素的圆角。如下 css 可以实现文本框(单行、多行)的圆角:
input[type=text],textarea{border-radius:3px;border:1px solid #000;}
border-radius 用法如下:
border-radius 属性是一个简写属性,用于设置四个 border-*-radius 属性。
该属性允许为元素添加圆角边框
语法:
border-radius: 1-4 length|% / 1-4 length|%;
按此顺序设置每个 radius 的四个值。
如果省略 bottom-left,则与 top-right 相同。
如果省略 bottom-right,则与 top-left 相同。
如果省略 top-right,则与 top-left 相同。
单位一般用px和百分比较多,其他单位也可

2、HTML中如何设置文本框的大小
边框的大小,可以使用CSS样式控制,如:
<textarea id="txtCon" >content</textarea>
<style type="text/css">
#txtCon{width:100px; height:20px;}
</style>
也可以使用文本框自己的属性,定义文本框的行和列控制大小,如:
<textarea id="txtCon" rows="100" cols="100" >content</textarea>
3、在html中如何实现将本网页中文本框中的值传递到另一个网页的用户名密码框中,并实现登陆
在html网页中,一个按钮,两个文本框,在<SCRIPT language=JavaScript> /SCRIPT>当中如何写代码能够实现将这两个文本框中的值传递到另一个制定地址的网页中的用户名和密码处,并实现登陆?
页面必须是跳转过去的才行。例如另一个页面是page.html那么你跳转的时候 page.html?username=tony&password=123 跳转到这个地址,
然后到另一个页面的时候在脚本里面写
<SCRIPT language=JavaScript>
var url = window.location.href;
然后var username = url.split("?")[1].split("&")[0].split("=")[1] //这样就获取到用户名了。
var password = url.split("&")[1].split("=")[1];
然后把值赋给你的密码文本框
document.getElementById("txtpassword").value = password;
document.getElementById("txtusername").value=username;
< /SCRIPT>
然后验证用户名和密码就可以了。

4、HTML中让表单input等文本框为只读不可编辑的方法
有时候,我们希望表单中的文本框是只读的,让用户不能修改其中的信息,如使<input type="text" name="input1" value="中国"> 的内容,"中国"两个字不可以修改。实现的方式归纳一下,有如下几种。
方法1: onfocus=this.blur() 当鼠标放不上就离开焦点
<input type="text" name="input1" value="中国" onfocus=this.blur()>
方法2:readonly
<input type="text" name="input1" value="中国" readonly>
<input type="text" name="input1" value="中国" readonly="true">
方法3: disabled
<input type="text" name="input1" value="中国" disabled="true">
完整的例子:
<input name="ly_qq" type="text" tabindex="2" onMouseOver="this.className='input_1'" onMouseOut="this.className='input_2'" value="123456789" disabled="true" readOnly="true" />
disabled="true" 此果文字会变成灰色,不可编辑。
readOnly="true" 文字不会变色,也是不可编辑的
css屏蔽输入:<input style="ime-mode: disabled">
有两种方法第一:disabled="disabled"这样定义之后被禁用的 input 元素既不可用,也不可点击。第二:readonly="readonly" 只读字段是不能修改的。不过,用户仍然可以使用 tab 键切换到该字段,还可以选中或拷贝其文本;
5、您还可以为您将要创建的文本框预设置一个想要显示的值,具体的设置方法您可以参考本站的编程测试!